Archive for June, 2010|Monthly archive page
What To Do About Green Pea Glut
Back in April, I planted 30 Green Arrow Pea seedlings in my crisis garden. So what does that mean is occurring now? I have quite a large crop of peas. One may call it a plethora of peas, perhaps.
I’ve been fortunate this year to have such a successful pea crop. The vines are standing a good 2 feet tall, and the majority of the pods have contained 10-11 small, bright green peas. Green Arrow Peas are pretty well known for producing a large and reliable crop, so I suppose I should have expected such an outstanding outcome when I decided to plant such a great number of seedlings.
Now I would never intentionally plant more of any one crop than my family can consume, freeze, and can, because that would just be wasteful. It is a very bad idea to plant more than you can reasonably harvest because vegetables that are left to rot on the vine will attract insects and mold. But as any experienced gardener knows, sometimes planting a vegetable or fruit just doesn’t turn out exactly as you expect it to. Certain plants are more likely to produce a glut than others. Zucchini, for example, is a plant that tends to bear more fruit than one even knows how to handle. This is because it is a prolific plant, can thrive in many climates, and just one plant can produce quite a few zucchini. Obviously, this is drastically different from planting, say, a carrot, where you know that one seedling will produce just one carrot.
A quick internet search will show you that gardeners have many different ways for dealing with garden glut. Some have become quite creative with recipes, such as this creative one for Chard Tzatziki to use a chard glut. Others get busy making refrigerator pickles to use a cucumber glut. This year, with my green pea glut, I am employing a variety of methods to best use my harvest:
- Canning- Visit the Pick Your Own website for easy, step-by-step instructions on how to can your peas. You do need to own some basic canning supplies such as jars, lids, a jar grabber, and a funnel in order to do this. If you do not own these supplies already, then definitely go ahead and invest in them now. They are worth much more than the purchase cost, and in the long run you can preserve pretty much anything in your garden by using the canning method.
- Freezing- It is quite easy to shell, blanch, store, and freeze green peas. You can follow these directions from Home School Helper to do it yourself. Make sure to write the name of the veggie and the date on the plastic storage bag before you put it in the freezer.
- Mashing- Try mashing peas instead of potatoes. Yes, it looks a little funky because it is bright green. But it is really, really good.
- Stewing- This recipe for stewed green peas also uses parsley, onions, and cabbage fresh from your garden.
- Appetizer-ing- Steam or blanch some peas until they are just tender, then mix them together with a scoop of sour cream, some salt and pepper, a few chopped green onions, and some fresh mint from your herb garden. A scoop of this makes a great side dish or appetizer. Throw in a couple slices of crumbled bacon if you wish to fatten it up a bit.
- Main dish-ing- In American cuisine, green peas are not often the star. However, they are often a main ingredient in Indian and Asian cuisine. Here is a delicious Indian recipe for Green Peas Masala.
If you have never planted peas before, then I would encourage you to try it for your next planting season. Green peas are frost-hardy, and can be planted throughout most of the United States. If you are preparing to enjoy your own wonderful Green Arrow Peas, then hap-pea harvesting!
Beans, Beans, the Magical Fruit…
Okay, so maybe they’re not magic, but as far as nutritional value goes, beans are pretty darn potent. Beans are like gold to diabetics, hypoglycemics, and those who are attempting weight-loss. Only 2-6% of the calories in beans are derived from fat, in contrast to 75-85% for meat and cheese. Beans are naturally cholesterol free, and have a very low estimated glycemic load, meaning that they do not trigger a spike in blood sugar or require the pancreas to pump out insulin.
But the healthy qualities of beans aren’t just attributed to what they don’t do, because they are also great little nutrient powerhouses. Garbanzo beans, for example, are chock full of fiber and protein, which help to keep you feeling full and fueled for a long period of time. On top of that, the protein that a garbanzo bean contains is complete protein, meaning that all of the necessary amino acids are naturally present in order to provide your body with peak quality (usable) protein. In other words, garbanzo beans could whip a protein bar’s butt any day.
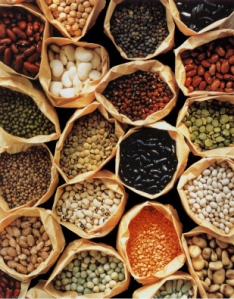
Every vegetable gardener should absolutely make room for beans in his or her garden plot. But how do you know which types of beans to plant? It can be difficult to choose, because there are an enourmous number of different varieties that may be divided among three different types:
 (1) The first type of bean is a snap bean. These include varieties of green, yellow, and string beans, including common bush and pole beans. There are over 130 known varieties of snap beans in the world. This type of bean is picked when the seeds are very underdeveloped and small.
(2) The second type of bean is a shell bean. Shell beans, also called horticultural beans, are harvested when the seeds are fully developed within their pods, but they have not dried out. A shell bean is considered to be any bean that is grown for the bean itself (the seed of the plant) rather than the pod. These include lima beans and runner beans.
(3) The third and last type of bean is a dry bean. Dry beans are harvested when the seed within the pod is completely developed and dried, and rattles within the pod when shook. Essentially, all three varieties of beans are the same. They are just harvested at different points of development. Therefore, green beans may be harvested at 50 days after planting, whereas dry beans will take 80-100 days. Types of dry beans include black beans, adzuki beans, and pinto beans.
With so many different types of beans from which to choose, it may take you a while to find your favorite varieties. One factor to consider is the space that you have available. Some types of beans, such as pole beans, can grow to be 6-10 feet tall and will need to be staked up on poles or a trellis.
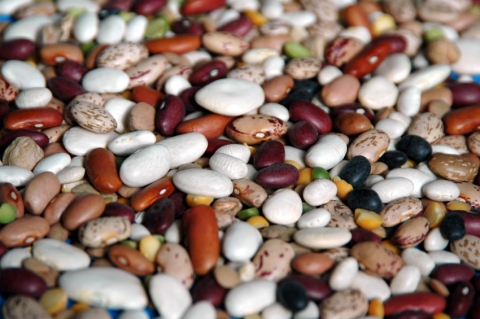
The bean varieties that I plant in my crisis garden each year are the Jacob’s Cattle Bean and the Stringless Black Valentine Bean. The Jacob’s Cattle Bean is an excellent bean choice for hearty dishes such as chili because they hold their shape well when cooked, and can stand a large amount of seasoning. The beans are beautiful in themselves- they are a deep maroon color with white spots, and have a shape similar to that of a kidney bean. Since the Jacob’s Cattle Bean is a dry bean variety, it takes about 100 days from planting to harvest.
The Stringless Black Valentine Bean is an interesting bean because it is a good example of how bean types can overlap. This particular type of bean was created in 1897 by crossing a Pencil Pod Black Wax Bean with a Black Valentine Bean. This bean can be harvested as a snap bean, meaning that you pick it in the pod 50 days after planting. The pods are slender and called “stringless” because, well, they’re stringless. I particularly like to use these in vegetable soups. You can alternately harvest Stringless Black Valentine Beans as shell beans after 70 days. The seeds are black when raw, but turn a pretty dark purple color when cooked.
Okay, now here’s the question you’ve all been waiting for: When cooking with dry beans, how do you avoid… ahem… flatulence inducing effects.
Well, there is no way to get rid of it entirely, since most dry beans are very high in fiber. But there are a couple different methods you can try to help remove gas-promoting substances. When soaking dry beans before cooking them, try changing the water 3 times and replacing it with fresh water each time. Then, give the beans another good, thorough rinse before cooking them. Another tip is to make sure you cook your beans thoroughly, as undercooked beans are most likely to contain gas-causing starches.
One good thing is that you are automatically less likely to get gas from homegrown beans than from store-bought beans. The reason is that beans actually become less digestible as they age, so the fresher the bean, the easier it will be on your digestive system.
Preparing for Life Without Oil
By now, we’ve all seen the images from the oil spill in the Gulf of Mexico. The photographic proof of damage to the water and wildlife, such as this picture above of a barely recognizable bird on the coast of Louisiana, are truly gut wrenching. The most recent news from dailycamera.com states that within the next few months, the oil slick could reach the Atlantic, and the coastlines of North Carolina, South Carolina, Florida, and Georgia.
Yet despite all of the heartbreaking photos of the unspeakable damage, you may be left thinking that the problem of the Gulf oil spill is one that is distant from you, and does not affect you directly. Unless you live in the south, you may feel far removed from this terrible made-made disaster and its repercussions. Even though these images are horrible, they don’t affect you directly, right? Wrong. Very wrong indeed.
Regardless of where you live in the United States, even if you live hundreds of miles away from the Gulf coast, you are being affected by the oil spill. This disaster, which happened over a month ago and is still going strong, is proof of what many have already known for a long time: we are using (and losing) oil more quickly than our planet can replenish it. Quite simply, we are stripping the Earth of its supply. We hit our peak oil supply in 2008, and since then there has been nowhere to go but down. Quite simply, our need for energy supplies keeps growing higher and higher, and we do not have the ability to meet this need.
So what happens when our oil is simply gone? As this article in the New York Times points out, it may mean food shortages, a collapse of the economy, and a breakdown of civil order. If you poo-poo the idea of “Peak Oil,” I would caution you to take a closer look at what it means first. You don’t have to be a survivalist like me to see that there is proof of it all around us. Two members of Congress, one a Democrat and one a Republican, even formed the Congressional Peak Oil Caucus.
I know that over the past year or so, we’ve all been perched on the edge of our seats, waiting for the economy to make an astounding and triumphant comeback after its pitiful decline. But unfortunately this is not what’s on the way. Because of peak oil, instead what we’re in for is an economic decline that will include high(er) energy prices, and food shortages when lack of fuel causes food and supplies to not reach grocery stores. Common products such as plastics and petrochemicals will become much more expensive. Imagine how scarce good will be come when EVERYTHING that is transported to stores by diesel fuel or gasoline simply cannot be transported.
Did you take a look at the previous link to the New York Times article? If not, do it now. It offers some valuable suggestions for how we can all be nest prepared for an energy crisis. Here are some suggestions of my own:
- Stock basic supplies and necessities.
- If you have not already, plant your Survival Seed Bank now. A crisis garden is totally self sustaining and the best way to insure that you have a reliable food source.
- Consider converting your stocks and investments into physical assets, such as gold and silver.
- If you feel lost or overwhelmed, seek outside assistance, such courses through Post Peak Living.
- Reduce your dependence on modern medicines. Instead, begin learning how to use natural remedies and cures. I would highly recommend planting a Survival Herb Bank. You can grow your own natural treatments for everything from diabetes to headaches.
- Assemble an emergency preparedness kit, with items such as pocket knives, multi-tools, folding shovels, hatchets, saw blades, mess kits, compasses, an emergency water filter system, and LED flashlights.
- Read up on how to live a self-sufficient lifestyle. Click here to see Enomni Massage Clinic’s suggestions for survivalist reading.
What the Heck is Lacto-Fermentation?
 I’ll give you three guesses.
- No, lacto-fermentation is not when your ice cream melts into a milky pool on a hot day.
- No, it’s not when the glass of milk you left out for Santa turns curdled.
- Nope, lacto-fermentation does not mean there is any chance that you will ever get drunk off of dairy milk.
Give up? Well I’ll tell you. Lacto-fermentation is actually a super healthy form of pickling. Yes, pickling!
If you recall from a couple weeks back, I blogged about the many different vegetables that my wife and I love to pickle. Yellow squash, okra, asparagus, and radishes name just a few. But here is the issue with pickling: Many people hate to do it in the summer, because it involves spending time over a hot stove. I don’t blame you. Traditionally, I have always thought of pickling as a bit of a fall activity as well, when cooler temps mean I don’t mind spending time in the heat of the kitchen.
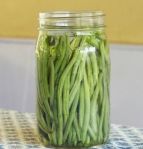
 Now, what if I were to tell you there is a very nutritional method for pickling certain vegetables that does not involve any heat or stove? You can still get crisp, delicious pickled veggies such as green beans, peppers, and cucumbers without using any heat at all. This method of pickling is… lacto-fermentation!
Many people see the word “lacto” and assume that it has to do with “lactose”, or dairy. But it doesn’t. The word “lacto” actually comes from the natural, beneficial bacteria that this method uses called lactobacillus. Remember, not all bacteria is bad, and this type of bacteria is a particularly friendly one. Lactobacillus converts the carbohydrates from the vegetables into lactic acid. And while it’s at it, it actually produces extra nutrients such as thiamin, fatty acids, B vitamins, biotin, and niacin. Yes, lacto-fermentation can actually help make your veggies even more nutritious. The presence of lactobacilli also increases digestibility of vegetables, and encourages the growth of healthy bacteria in your intestines.
Is lacto-fermentation safe? Yes, I can assure you it surely is. In fact, people have been using this method in many cultures for hundreds of years because it is safe, tasty, and cheap too, since it doesn’t require many ingredients or supplies. It’s likely that your ancestor used lacto-fermentaion.
Ready to try it out for yourself? Excellent! I like to use my White Wonder Cucumbers from my Survival Seed Bank for this recipe. They are ideal for pickling. If you’d like, you can use a variety of cucumber that is actually labeled as a “pickling cucumber” such as the Bush Pickle Cucumber, or the Homemade Pickle Cucumber. These grow to be about 3 inches and 5 inches, respectively, so they’re smaller than your average cucumber. Regardless of the type you use, make sure you select cucumbers that are firm and not overripe. When you cut it open, you should not have fully developed seeds. White Wonder cucumbers can grow to be up to 9 inches in length and have a gorgeous ivory-white color. However, when I pickle them, I prefer to pick them at 6-7 inches. Here is my tried-and-true lacto-fermentation cucumber pickle recipe.
4-5 pickling cucumbers (3-5”), or 2 full sized cucumbers (6-7”)
1 tablespoon mustard seeds
2 tablespoons fresh dill, snipped
1 tablespoon sea salt
4 tablespoons whey
1 cup filtered water
Wash cucumbers well, and either leave them whole, or cut them into your desired shape. Place all of them in a quart-sized wide mouth jar. Combine the remaining ingredients and pour over the liquid over the cucumbers, adding more water if necessary to cover the cucumbers. The top of the liquid should be at least 1 inch below the top of the jar. Cover tightly this tightly with the jar lid, and let it sit at room temperature for 3 days before transferring it to your refrigerator. *Tip- to preserve the crispness of the pickles, add a few grape leaves to the jar before covering it.
 Leave a comment


